Un petit article pour mettre en avant un site vraiment sympa: Coursera
Une centaine de cours disponible, une organisation parfaite, une ergonomie bien pensée, et tout ça gratuitement. Il y a même un petit faux-diplome à la fin en guise de cerise sur le gateau.
Je vais suivre uniquement le cours de Machine Learning, enseigné par Andrew Ng, Professeur à l’université de Stanford. Les vidéos + quiz + exercices m’ont l’air de prendre pas mal de temps mine de rien.
Ci dessous, des liens utiles et des aperçus du site.
L’AI Challenge consiste à créer une intelligence artificielle: vous créerez un programme informatique (dans n’importe quel langage) qui contrôle une colonie de fourmis devant se battre contre d’autres colonies pour la domination totale!
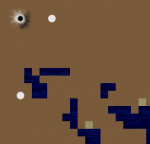
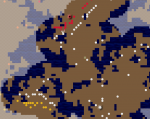
Basic situation, the antHill on the top left corner, ants are white dots. Grey dots are food and blue is water (can’t go through)
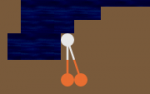
Simple fight: 2 versus 1. The 2 orange ants will survive.
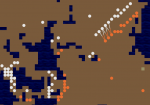
Complex map control by good players
Complex game control with several players
Ci dessous une partie des top players afin de visualiser le jeu:
NB: cliquez sur le bouton « plein écran » afin d’avoir un meilleur confort visuel et les touches +/- pour ajuster la vitesse de la partie.
Loading…
Les règles sont les suivantes :
Le joueur gagne des points (2) en rasant les fourmilières adverses. Il perd un point par fourmilière perdue.
A chaque fois que le joueur « ramasse » un bloc de nourriture, ce dernier disparait et une nouvelle fourmi est créée dans une des fourmilière de ce joueur.
Les parties sont jouées sur des cartes de 2 à 10 joueurs.
I’m going to describe briefly here how my C# bot works. It’s very far from being perfect, even far from being good but I made something working. And I finished it on time.
The code contains a couple of array -maps- containing different infos, updated in real time for some, and at the begining of every turn for others.
mapWater: Water map
mapVisible: number of my ants seeing a specific Tile
mapLastTurnSeen: Map of last turn value I’ve seen the specific Tile
It computes every routes in a certain range in order to protect my hills, attack enemy hills or collect food. Add them to a list and sort them afterwards
Food routes are less important than defendHills & attackHills ones. I picked a coef 3 in order to make this distinction. Thus a 3 cells AttackHill route is equivalent to a 9 food route.
After the filter applied, I give the « real » orders right away. (I won’t change them)
The defendHills make 2 of my closest ants go towards one enemy. No more.
One piece of food is target by only one of my ant (the closest, if not used for defending or attacking ofc)
Phase II: Attack close enemy ants
After that I make my free ants attacks close enemy. The idea is to « push » enemy and to diffuse my ants towards enemy hills.
Phase III : The Sentinel
After that I make, if I got enough ants, one of them stay close to my hill. This way I can see if an enemy is coming. This ant will not stay static because of the previous calls. If a food just appears, it will go collect it which will generate a new ant (which will probably take the « Gardian » position, if nothing else is needed) Same if an enemy ant approches, it will go fight it.
Phase IV: Explore the map
A good exploration state
Then and last, I call the ExploreMap function where Free ants will go explore the map.
I use a map monitoring the last tour I’ve seen every cell in order to make the ant goes somewhere « new ».
It goes towards 8 differents directions (E/N/S/W and combinaison like N-E)
I start one cell further the view range of the picked ant. If alls cells are already seen, I go one cell further. (Water tiles are not taken into account)
The 8 cells are then sorted by turn they have been seen. The ant will go toward the « oldest »
TECHNICAL DETAILS
1.Movement
Directions are made with an A* algorithm. I use the following one that I’ve modified just a little bit.
I have a list of timeout routes which helps me to not compute too long – complicated – routes again and again.
I wanted to do the same with computed routes (to not have to compute them again and again if needed, but they can change if I discover that an unseen tile is actually a water tile) I started to filter them every turn but it was really too time-consuming.
2. Fight:
Everytime I give an order, I test the « safety » of the area. My implementation is not really good, but it gives a basic idea of the security (not optimized though)
I sorted safety into 3 different categories (following some advice I found on the forum, Memetix® style)
SAFE: no worries it’s ok
KILL: I can expect to have a 1-1 trade with the enemy
DIE: It will be worse.
Some of the following conditions make my ants decide (or not) if they should go to a KILL area like :
If there’s a food between the enemy and I. If I have a lot of ants etc etc.
If it’s considered to be unwise to go, the ant will try a close direction, or to stay put or even to go back in order to avoid death.
PROBLEMS ENCOUNTERED
1. A* Algorithm
First of all, the A star algorithm.
I picked C# because it’s the language I use at work and I’m the most used to. However, existing Astar code are legion in c++ but real few in C#
I tested 2 very well graded on source code website. Istarted with what I thought was the best of them. Timeout used to occur if the path was 10-15 tiles long. I developed my bot during 2-3 weeks with this algo, making a lot of concessions because of the timeout problems. Then I found out it wasn’t normal at all and found a new one, which was described as « not perfect » because it’s not giving the shortest path.
It was the worst error I made, to not have discovered this one before. I kinda lost one week and a half.
2. Exploration
I started with monitoring how many ants were seeing every tile, trying to send them where tiles were « less » seen. It was working ok but I had some very bad « cycles » where ants used to jitter.
I switched to the last turn seen way, which gave me better results.
Before my final submission (like 12 hours before :s) I still had some bad behaviours: in some maze_map, ants used to stack at one point and jitter alltogether, like if it was awesome to finally have some security or friends or I don’t know. Anyway, I patched it quickly: ants which don’t have any orders at the end, if surrended by more than 7 ants in some small perimeter should go towards the closest enemy.
It’s dirty, it’s last minute modification, but I think it was worth it.
NB: After almost every group of modification I made during the last 2 days, I ran a couple of test games (~10) where I’m supposed to win against middle-skilled opponents. It happens that results were pretty bad so I could review the previous modifications.
CONCLUSION
I spent a lot of time on the exploration system. I wanted to go step by step and not rush the global feature bot too soon.
The first implementation I made was just monitoring enemy position, creating an array of « Unsafe » positions and … that’s it. It was obviously not good at all, my ants were just fearing every single enemy. I found the memetix post (link) and tried to implement it, but I guess I screwed up because I had to make some modifications and the result is far from my expectations. Time went fast and I couldn’t have a « proper » fighting system and the result is that I can’t really play map control like pro players do: having walls of ants facing each other.
Anyway, it was a really interesting contest. I’m glad I found it quite soon (I think I missed the 2 first weeks but I had 1month and a half to develop something) I’m also glad that « Fredo », a colleague of mine followed me on this event, so we could compare and improve our bots. I think the result would have been way worse (yeah, it’s possible I’m sure!) if I was alone on it.
Even if they won’t see that, I’d like to thanks the organizers for their amazing job. The game engine was awesome, the starter pack perfects, tools aswell. The finals (even if it’s still going on) are really interesting. The community was very friendly and best players gave tips and shared their source code at the end, which is very nice and very interesting.
Aujourd’hui je vais expliquer brièvement les deux manières les plus communes afin d’interagir avec son serveur Exchange. Grâce à cela, nous pourrons ensuite effectuer des opérations du type réception et envoi d’email et bien plus encore…
Mais commençons par le début :
Partie I: Configuration et initialisation de la connexion avec le serveur Exchange
Introduction
Il y a plusieurs façons de se connecter et de communiquer avec le serveur Exchange, du plus simple (en utilisant la nouvelle API conçu récemment par Microsoft) jusqu’au plus compliqué (envoyer des requêtes XML/ SOAP). Dans cet article je parlerai uniquement de l’API managée et du Webservice EWS offert par le serveur Exchange
Utilisation de l’API EWS Managed 1.1
Etape 0 : Que fait cette API ?
Elle permet de rendre plus facile l’utilisation des services offerts par le serveur exchange en encapsulant les fonctionnalités dans des méthodes bien pensées.
La DLL dont nous avons besoin (Microsoft.Exchange.WebServices.dll) se place par défaut dans le dossier C:\Program Files\Microsoft\Exchange\Web Services\1.1\
Etape 2 : Création d’un projet C# et ajout de la référence
Ouvrir Visual Studio, créer un nouveau projet Windows Forms Application et ajouter cette DLL dans références.
Etape 3 : Code basique nécessaire à l’initialisation du service
Copier ce qui suit dans votre code :
usingMicrosoft.Exchange.WebServices.Data;//Permet d'utiliser les fonctionnalités de l'API
using Microsoft.Exchange.WebServices.Data; //Permet d'utiliser les fonctionnalités de l'API
Et ce qui suit dans le corps d’une méthode :
ExchangeService service =new ExchangeService(ExchangeVersion.Exchange2010_SP1);
m_service.Credentials=new WebCredentials(sUser, sPwd, sDomain);
m_service.Url=new Uri("https://SERVER/EWS/Exchange.asmx");
ExchangeService service = new ExchangeService(ExchangeVersion.Exchange2010_SP1);
m_service.Credentials = new WebCredentials(sUser, sPwd, sDomain);
m_service.Url = new Uri("https://SERVER/EWS/Exchange.asmx");
Dans le cas d’une où le certificat de sécurité n’est pas signé, vous pourriez voir vos requêtes refusées, dans ce cas ajoutez ceci :
L’utilisation du web service n’est pas conseillée par Microsoft, même si elle fournit quelques fonctionnalités poussées supplémentaires (pour le moment) par rapport à l’API(ExportItem par exemple, j’y reviendrais dans un prochain article)
Etape 1 : Création d’un projet C# et ajout de la web référence
Ouvrir Visual Studio, créer un nouveau projet Windows Form Application et ajouter dans une référence à un service. Taper ensuite l’adresse de votre service (https://SERVER/EWS/Exchange.asmx) et rechercher le service. Ajouter le en spécifiant un namespace approprié (ici, je le nomme ExchangeWebRef)
Etape 2 : Code basique nécessaire à l’initialisation du service
Question : Dans le cas de l’utilisation du Web Service, je ne parviens pas à trouver la classe ExchangeServiceBinding dans la référence de service que j’ai ajouté.
Réponse : Ajouter le web service en passant par avancé>ajouter une référence web
Pour introduire ce post, je vais citer wikipedia (Oui, c’est le mal je sais, mais au moins je ne perdrais personne des la premiere ligne :))
« La cinématique inverse (souvent abrégée IK, de l’anglais inverse kinematics) est un procédé par lequel on peut déterminer les positions et rotations d’articulations d’un modèle afin d’obtenir une pose.
Le terme « cinématique inverse » renvoie au fait que l’étude cinématique se fait généralement à partir des paramètres des articulations, afin de déterminer l’évolution de la pose. »
Durant ce projet, l’un des buts était l’implémentation d’une fonction permettant de calculer la pseudo inverse d’une matrice non carrée. Apres quelques recherches, les algorithmes SVD (pour Singular Value Decomposition) et Greville sont apparus etre les plus a meme de remplir ce role. Je ne vais pour le moment pas rentrer trop en detail dans le reste du projet, mais je voulais surtout que ces deux algorithmes soient disponibles (j’avais pas mal cherché du code a ce moment la, sans réussite) Les 2 fonctions sont implémentées en C++ avec l’aide de la library GSL Library.
Dans l’archive, vous trouverez l’implementation des algorithmes Greville et SVD, ainsi qu’un simple code de test permettant de tester leurs performances respectives. Pour aller plus vite, voici un graph a propos de la vitesse d’execution des 2 algorithmes.
Le second projet du cours « Cryptographie et sécurité des réseaux », suivi a l’Université de Stavanger, Norvège était un cran plus complexe que le premier, particulierement durant la génération des clés: nous devons manipuler des nombres extremement grands. J’ai développé l’application en Java et utilisé la classe BigInteger pour gérer ces nombres énormes.
Le programme fonctionne comme cela:
1. D’abord vous devez générer votre clé publique et votre clé privée, puis sauvegarder la clé publique (le programme vous permet de la sauvegarder dans un fichier .pk)
TO FINISH
2. Then, type your message and sign it, then save it in a file ( .mes extension)
3. The last step (the most important) is the part where you check if the message loaded really comes from the official writter. So you have to load his public key, load the message and then press check.
Here is a screenshot of the application:
For information, I have implemented the digital signature algorithm with a 1024 bits long p and a 160 bits long q (for people who knows what the DSA algorithm is all about)
I use a hash function made by myself. You can find everything in the code at the end of this post.
And you can download the whole project (code + exec + report) here : > Download <